Add a Quarq powermeter to your track bike? Yes you can.


Sweet Quarq Powermeter setup
My new Quarq powermeter on my Felt Track bike

After the first day at the track, you will quickly learn that there is a whole new cycling vernacular. Are you running a 94″ gear, do you warm up with an 88”? Those numbers are terms just about the bike, never mind the stayer’s line, rail, and others. Being a roadie, I wanted to do roadie training. I wanted to know how to add a powermeter to my track bike.


Getting together the parts

The first thing about the track bike is that it does not run a standard 110 or 130 BCD spider, it’s a 144. Since I am a big fan of Quarq, I went to their website to find out which Quarq powermeter is track compatible. The answer, all of them, sort of.

Back to the BCD. Yes, you can get an array of 110 and 130 BDC chainrings but nothing like the 144 BCD chainrings. You could use a 110 BDC and have a few chainrings, but the selection of 144 is much greater. Quarq only has 110 / 130 BCD powermeters. SRM has a dedicated 144 BCD Track Cycling Powermeter, but again, my preference is Quarq.

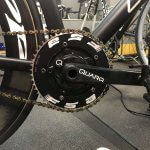
After a phone call to Quarq in Spearfish, South Dakota, I learned about an adaptor sold by a 3rd party.  The 3rd party adaptor converts a 110 to a 144 BCD. After a little research, I found the BDop Cycling 110 BCD to 144 BCD Track Adaptor for $69.99 plus shipping. I ordered two and waited, but not long. The adaptors left China on DHL and were here in Virginia in 4 days.  The shipping was a bargain, only $15. With my Quarq 110 DZero in hand and the BDop Cycling adaptor, I went to work.

Trial and Error

All the items put together snuggle
Quarq, adaptor, chainrings, nice and secure

My first “glitch” was the proper size chainring bolts. Remember you are going to put the adaptor on the powermeter, so you need to have an additional five chainring bolts. On the 56 Felt FK2, I used the SRAM chainring bolts without any issues.  On the 51 Felt, I used the Sugino 75 knurled track chainring bolts to secure the adaptor to the Quarq. Then I needed another five to secure the Chainring to the adaptor. Adding these bolts was a little more difficult, because of the thickness off the chainring and adaptor, did not allow the 5mm bolts for enough thread to secure the back. I needed a set of 8mm chainring bolts which Sugino makes.

Getting them to fit was a little bit of a challenge.
Countersunk side to clear the frame on the 51 Felt

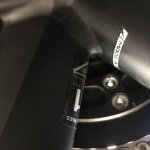
The first attempt at mounting the adaptors, I followed the instructions on BDops website. The video showed the adaptor mounted on the powermeter like a chainring and then the chainring on the adaptor.  The issue was the chainline measurement was a little off and the chain did not fall directly on the sprocket and chainring.  This resulted in an extremely loud drivetrain.  I stopped by two bike shops and neither had a solution.  After talking to a friend, Will Wong, I moved the adaptor inboard of the powermeter spider and then I mounted the chainring normally.  This worked fantastic on the 56 Felt.  I needed to do a little modification for the 51 Felt.  I had to flip the adaptor so that the countersunk facing was toward the bottom bracket so that the back of the chainrings bolts went into the adaptor to clear the frame.

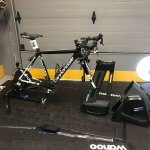
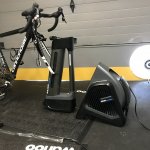
With the adaptor on, powermeter in place, I went to the track to collect data. This setup worked great. After my laps around the track, I can get data beyond, speed, cadence, and speed. If you are looking to add a powermeter to a track bike, I would highly recommend the Quarq/Bdop solution.

Riding uphill into the wind while watching Netflix

Uphill Stationary Bike
Dana’s pain station in our Bike Torture Chamber (BTC)

Given where I live, my job, and my training schedule, attempting to execute workouts during the week by riding outside is a challenge.  Years ago, I purchased a CompuTrainer and discovered the joys of a smart trainer.

While CompuTrainer was the leader in the smart trainer market, they failed to recognize the economic potential of such a product. Enter Wahoo. We soon replaced our CTs with Kickrs (our review on the CT vs. KICKR).  Life was good.

Wahoo soon entered the bike computer market with the Elemnt (apparently someone at Wahoo does not like vowels!).  Hubby bought me one and I begrudgingly tried it.  Loved it.  Ditto for the bike mat.  Moral of this story thus far:  Hubby loves to try all the accessories.  I do not.  (bike mat for $50+?  $10 yoga mat is fine)

Wahoo recently added two more accessories (which include all the appropriate vowel):  the Headwind and the Climb to the smart trainer family.  I received both for my birthday.  Priced at $249.99 and $599.99, these accessories are not cheap.  Are they worth it?  When Hubby told me about these items, I was more interested in the Climb, since I enjoy mountainous terrain.  I thought the Headwind would be a gimmicky rip-off.

The Climb:  The Climb replaces your front wheel.  Using Bluetooth, the climb will pair with your smart trainer and allowing Zwift to adjust the front end of the bike as you climb and descend the volcano on Watopia.  One can manually set the level as well and there is a return to zero gradient option.  Is it fun?  Yes.  Does it simulate climbing?  As much as is probably possible, given the garage is in Virginia and the Alps are in France.  It is better than stacking books or multiple riser blocs.  Is it worth $600?  Depends on your budget constraint.  (One aside – as a former bike fitter, I would love to use the Climb for bike fits – very easy to level the bike.  One could also put a rider closer to the position one is in while climbing – for those riders who have pain while climbing, this would provide some insight.)

Wahoo Climb and HEadwind
Dana’s setup with the Wahoo Climb and Headwind

The Headwind:  To be honest, I thought a fan that costs $250 was just plain stupid.  I could care less that it adjusts the speed of the fan based on my effort on the bike paired to the smart trainer.  Then I got on the bike and turned it on the highest setting.  It was 90+ degrees outside and very humid.  Normally, riding inside is virtually impossible on the hot and humid days in July and August.  OMG. That fan is awesome!  It sits on the floor and the angle is perfect – hits you in the face and upper body.  I have asthma and if I feel overheated while pedaling inside, breathing is problematic.  After the first ride, I thought – awesome fan but $250?  Too high.

After a week of riding inside doing some nasty intervals that left me hanging over the handlebars, wanting to vomit on the Climb, I fell in love with the Headwind.  All $249.99 + tax worth of it.  I think one of the greatest challenges for most people riding on a smart trainer, outside of boredom, is sweating/heat.  The Headwind solves that issue.

My final thoughts – The Climb makes Zwift more fun.  The Headwind makes you better able to stay on the bike and complete the workout on the smart trainer.  Which of the two makes you faster up Col du Galibier?  As always, no shortcuts, only hard work.  For me, I would buy the Headwind since it helps me train harder.  The Climb is fun but expensive.


Dana