How to Hit Your Protein Goals Without Supplements

Getting through the Protein Puzzle can be a challenge for some people. If you’re finding it hard to hit your protein goals, don’t worry – we’ve got you covered! This blog post will discuss five easy ways to boost your protein intake without supplements, or protein shakes four times a day. So we’ve got you covered whether you’re looking for quick and easy breakfast ideas or snacks to help you power through your day. Thanks for reading!

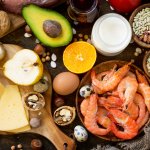
Bodybuilding and other competitive athletes often need up to 200 grams or higher of protein per day to support their active lifestyles. While this figure can be reached through supplements like protein powders, it is possible to reach this target solely through a balanced, nutritious diet. Remember the function; protein rebuilds muscle tissue. Healthy foods such as lean meats, dairy products, eggs, legumes, nuts, and seeds can provide the necessary high-quality protein to fuel an athlete’s performance and recovery. You do not have to do a massive protein shake at the end of the day to get adequate protein.

Constructing a Balanced Diet with Protein at its Core

To optimize your body’s protein uptake after exercise, consider portioning your protein intake over the day instead of one large dose. To add variety to your meals and snacks, use the National Nutrient Database to search for high-protein options within each food category. You can easily track and vary your protein sources to get the best results.

Jump-Start Your Morning with Protein-Packed Breakfast Choices

 Breakfast Protein!!

Reach Your Protein Goals with a High-Protein Breakfast! Eggs are a great source of protein: two large whole eggs provide over 12 grams and adding three or four extra egg whites ramps up the total to over 20 grams. Consider topping your dish with an ounce of cheddar for an additional 6 grams, and serve it with a 4-ounce ham steak for 22 more grams. An egg-based breakfast like this can get you close to 50 grams of protein before you even start your day!

Other options:

  • Greek yogurt
  • Skim milk
  • Breakfast sausage
  • Turkey Bacon
  • Low fat cottage cheese
  • Peanut butter and other nut butter

Enjoy a Range of Nutritious and Filling Midday Meals with High Protein Food

Boost Your Protein Intake with High-Protein Meals! Lunch and dinner provide ample opportunity to increase your daily protein intake. For example, a cup of roasted chicken breast can add 43 grams of protein to your meal, while a single small breast can bring 26 grams. Incorporating dairy products such as milk, cheese, and yogurt increases the protein content. Don’t forget legumes such as peas, beans and lentils; they are an excellent source of surprisingly high amounts of protein. Quinoa is a complete protein because it contains all the essential amino acids needed. The seed (most people think it’s a grain) is packed with about 8 grams of protein per cup.

Get Your Protein Fix With a Mid-Day Meal!

  • Grilled Chicken Breast
  • Greek Yogurt
  • Nuts and Seeds
  • Quinoa
  • Hummus and Veggies
  • Tuna Salad Sandwich
  • Hard Boiled Eggs
  • Edamame

Nourish Your Body with a Delicious and Healthy High-Protein Dinner

Dinner is the optimal mealtime to focus on high-protein foods, as you’ll have more time and flexibility to prepare the meal. Try using proteins like salmon, mackerel, trout, herring, or pike, which all come with a hefty serving of protein – a 5-ounce fillet can contain over 30 grams of protein! And don’t forget to add some nutritious and delicious side dishes for an extra boost. Beans rarely receive the credit they deserve for their impressive protein (and fiber !) content. For example, one cup of garbanzo beans or black beans offers 14 grams of protein and about just as much fiber, a nutrient most of us need more of. Like supplements and seeds, beans are easy to incorporate into your daily grub. Add a handful to your salad at lunch, snack on hummus, or swap traditional pasta for noodles. Want the rockstar of fish? Try Atlantic Cod, which has lots of protein and your daily recommended allowance of Vitamin B12.  Here is how I make my infamous Chuck’s Chicken.

Feasting on High Protein Dinners!

  • Lean beef, pork, lamb, and other meats
  • Poultry
  • Shellfish, such as shrimp or crab
  • Soybeans
  • Baked Beans
  • Lentils
  • Cheese and Broccoli
  • Whole grains
  • Cheese and dairy products
  • Garbanzo beans

Satisfy Your Cravings and Stay Energized With Protein-Rich Snacks!

If you’re not a fan of large meals, you can still reach your protein goals by snacking throughout the day. Nuts and seeds are great high-protein snacks that are sometimes hard to incorporate into large meals – for instance; pumpkin seeds come in at about 9 grams per quarter cup, and almonds at 16 grams per half cup!

Try These High-Protein Snacks For a Satisfying Boost!

  • Nut Butter
  • Quinoa
  • Biltong
  • Hemp Seeds
  • Protein Smoothies
  • Nuts
  • Sunflower seeds
  • Hummus
  • Cottage cheese
  • Cheese
  • Low-fat milk or chocolate milk

Fuel Your Performance and Reach Goals With Nutrient-Dense Foods for Optimum Nutrition!

Make Sure You Give Your Body Everything It Needs With Balanced Meals of Protein, Carbs, and Fats! To maximize your performance level and reach your goals while maintaining a balanced diet, pick nutrient-dense foods to get the most nutrition bang per calorie. Try choosing whole grains, nuts, and avocados instead of highly processed items like chips or sugary snacks. As you continue your journey towards health and fitness, it will become easier to make those wise choices that boost nutrition with every bite.

What is your favorite protein snack?

Bonus Recipe

Honey Greek Yogurt Parfait

Prep time: 5-minutes | Cook time: 0 minutes | Serves 2

Ingredients

2 cups nonfat plain Greek Yogurt

Two tablespoons creamy unsweetened peanut butter

One tablespoon honey

One teaspoon of vanilla extract

1 large sliced banana

1/2 cup granola

Prep:

  1. Mix the yogurt, peanut butter, honey, and vanilla in a medium bowl. Stir until completely combined and smooth.
  2. Into each of 2 airtight containers, place a heaping cup of yogurt topped with half a banana and two tablespoons of granola and seal.
  3. Store the airtight container in the refrigerator for up to one week.

Per Serving (1 parfait)

Calories: 343 | fat: 15.9g | carbs: 53.1g | protein: 31.3g

Riding uphill into the wind while watching Netflix

Uphill Stationary Bike
Dana’s pain station in our Bike Torture Chamber (BTC)

Given where I live, my job, and my training schedule, attempting to execute workouts during the week by riding outside is a challenge.  Years ago, I purchased a CompuTrainer and discovered the joys of a smart trainer.

While CompuTrainer was the leader in the smart trainer market, they failed to recognize the economic potential of such a product. Enter Wahoo. We soon replaced our CTs with Kickrs (our review on the CT vs. KICKR).  Life was good.

Wahoo soon entered the bike computer market with the Elemnt (apparently someone at Wahoo does not like vowels!).  Hubby bought me one and I begrudgingly tried it.  Loved it.  Ditto for the bike mat.  Moral of this story thus far:  Hubby loves to try all the accessories.  I do not.  (bike mat for $50+?  $10 yoga mat is fine)

Wahoo recently added two more accessories (which include all the appropriate vowel):  the Headwind and the Climb to the smart trainer family.  I received both for my birthday.  Priced at $249.99 and $599.99, these accessories are not cheap.  Are they worth it?  When Hubby told me about these items, I was more interested in the Climb, since I enjoy mountainous terrain.  I thought the Headwind would be a gimmicky rip-off.

The Climb:  The Climb replaces your front wheel.  Using Bluetooth, the climb will pair with your smart trainer and allowing Zwift to adjust the front end of the bike as you climb and descend the volcano on Watopia.  One can manually set the level as well and there is a return to zero gradient option.  Is it fun?  Yes.  Does it simulate climbing?  As much as is probably possible, given the garage is in Virginia and the Alps are in France.  It is better than stacking books or multiple riser blocs.  Is it worth $600?  Depends on your budget constraint.  (One aside – as a former bike fitter, I would love to use the Climb for bike fits – very easy to level the bike.  One could also put a rider closer to the position one is in while climbing – for those riders who have pain while climbing, this would provide some insight.)

Wahoo Climb and HEadwind
Dana’s setup with the Wahoo Climb and Headwind

The Headwind:  To be honest, I thought a fan that costs $250 was just plain stupid.  I could care less that it adjusts the speed of the fan based on my effort on the bike paired to the smart trainer.  Then I got on the bike and turned it on the highest setting.  It was 90+ degrees outside and very humid.  Normally, riding inside is virtually impossible on the hot and humid days in July and August.  OMG. That fan is awesome!  It sits on the floor and the angle is perfect – hits you in the face and upper body.  I have asthma and if I feel overheated while pedaling inside, breathing is problematic.  After the first ride, I thought – awesome fan but $250?  Too high.

After a week of riding inside doing some nasty intervals that left me hanging over the handlebars, wanting to vomit on the Climb, I fell in love with the Headwind.  All $249.99 + tax worth of it.  I think one of the greatest challenges for most people riding on a smart trainer, outside of boredom, is sweating/heat.  The Headwind solves that issue.

My final thoughts – The Climb makes Zwift more fun.  The Headwind makes you better able to stay on the bike and complete the workout on the smart trainer.  Which of the two makes you faster up Col du Galibier?  As always, no shortcuts, only hard work.  For me, I would buy the Headwind since it helps me train harder.  The Climb is fun but expensive.


Dana


Time to take an FTP Test

FTP Test
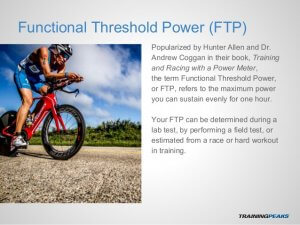
An internet search for “How to take an FTP test” provides a flurry of results.  Google and Alexa cannot evaluate this information for you.  Which testing protocol should you use?  How often should you execute one?  Is an FTP test worth the pain and suffering?

In this blog entry, we will discuss the information you need to know to best execute an FTP test. Before we get to the nitty-gritty details, it is important to understand the history and purpose of this metric.  Once we understand FTP in the proper context, I will outline the testing protocol used by KyleCoaching.

The ABCs of FTP:

What is Functional Threshold Power (FTP)? Exercise physiologists study the effects of blood lactate related to exercise intensity.  From this research, we can use blood lactate concentration as a means to determine aerobic training levels.  An athlete’s cardiovascular fitness (VO2max) sets the upper limit to their rate of aerobic energy production and Lactate Threshold as a percentage of their VO2max they can utilize at any given point in time.  Most endurance sports athletes to use an FTP test to set such zones or levels.

According to Hunter Allen and Andy Coggan, FTP is defined as “the highest power that a rider can maintain in a quasi-steady state without fatiguing for approximately one hour. When power exceeds FTP, fatigue will occur much sooner, whereas power just below FTP can be maintained considerably longer (Allen and Coggan 2010)”.

Over the years, Hunter Allen’s 20-minute FTP test yielded the most success.  Also, we prefer TrainingPeaks as our platform to deliver training plans, and they have an automatic threshold change notification built in for the athlete.  The formula for Allen’s FTP test is straightforward.  Take your hardest 20-minute test effort and subtract 5%.  The result is your functional threshold value.  For example, suppose your 20-minute effort yielded an average power of 200 watts, your FTP would be 190 watts.  Hunter Allen explains in his blog that you subtract the 5% from your average since your actual FTP is the highest average power you can maintain for sixty minutes. (Allen, Hunter Allen Power Blog 2013)

From our perspective, the Coggan Protocol is a reasonable estimate of your hour power and is currently what most coaches recommend, and athletes perform.  We describe this test in the following section.

There are other options that we feel should be mentioned as alternatives.

Friel Protocol – 30-minute test – all out effort for 30-minutes and use the average of this as your FTP (Friel 2009)

CTS Protocol –  2 x 8-minute test – where you take the higher number of two back-to-back 8-minute efforts then subtract 10% (Carmichael Training Systems LLC. 2009).

Once you calculate your FTP, you enter this number into your TrainingPeaks zone setting to have it auto calculate based on Threshold Power and Andy Coggan (6) method.

Test? I hate tests. What do I need?

  • You will need a power meter and a head unit to display (a) your power and (b) a timer.
  • Before you start the test, ZERO your power meter.
  • Be forewarned that this is a VERY HARD test.
  • The test can be completed indoors on a trainer or outdoors on the road. We have found that most riders get a higher value outdoors.  However, this last winter we have seen several athletes that have been able to replicate the outdoor FTP test using Zwift indoors. The choice is yours.

How often should I test?

Initially, we recommend that an athlete take the test and repeat it two times over the next 8-weeks.  These tests have a learning curve and new athletes typically pedal too hard at the beginning and fade dramatically toward the end, if they make it that far.  The results from the FTP test determine training zones, which should be set at the beginning of a four-week training block.  At the end of the training block, we test again.  Typically the FTP test at the end of the second block is the one executed to standard.

The COGGAN PROTOCOL

Start with a good warmup.  The warmup below is more descriptive than prescriptive. If it takes you a little longer to warm-up, take all the time you need.

The main set is prescriptive.  The first 5-minutes is an all-out effort.  Remember your Threshold Power is an aerobic activity.  By making an all-out effort, it will minimize how much your anaerobic system will contribute to your FTP test.  Easy pedal for 5-minutes.  When you are ready for the 20-minute effort, hit the lap button and go at it.  Do not start off as if it were a sprint, stay in the saddle and go hard.  Settle into a rhythm and hold a power that you believe you can do for twenty minutes.  At the end of the test, cool down.

Upload your workout to Training Peaks.  If you did not have an FTP calculated in the software and notifications are set on, the software will determine your new FTP and email you a sweet little note.  You can also go into the workout and select your peak 20-minutes.  Take that average power number and multiply it by 95%.  This will give you your FTP.  Add this number to your TrainingPeaks setting and calculate Threshold Power, Andy Coggan (6) method and this will set your training zones.

The workout shown below is an actual FTP test.


FTP Test     Initial Test Follow on Tests
Activity Time Description Perceived Exertion (1-10) % of FTP
Warm-up 20 min Easy riding 4 <65
  3 x 1 min (1 Min RBI)

Fast pedaling, 100+ RPM

4 <50
  5 min Easy Riding 4 <65
Main Set 5 min All-out 10 Max
  10 min Easy riding 5 <65
  20 FTP Test 10 Max
Cool down 15 min Easy riding 5 60

Should I do this every four weeks?

In general, assessing threshold power a few times per year (e.g., near the start of training as a baseline, partway through the pre-competition period to track improvement, and during the season to determine peak fitness achieved) is probably sufficient.

References

Allen, Hunter. Hunter Allen Power Blog. January 9, 2013. http://www.hunterallenpowerblog.com/2013/01/what-is-ftp.html (accessed May 6, 2018).

Allen, Hunter, and Andrew Coggan. Training and Racing with a Power Meter. Boulder: Velopress, 2010.

Carmichael Training Systems LLC. CTS. 2009. https://trainright.com/cts-field-test-instructions-training-intensity-calculations/ (accessed May 6, 2018).

Friel, Joe. Joe Friel’s Blog. November 26, 2009. http://www.trainingbible.com/joesblog/2009/11/quick-guide-to-setting-zones.html (accessed May 6, 2018).