The Dog Days of Summer and Interval Training

During the winter, we complain about boring hours spent riding indoors, going nowhere.  As summer arrives, the trainer becomes a forgotten friend, a distant memory until that first outdoor interval workout.  Despite the boredom, riding indoors provides controllability seldom available on an actual road.  Riding indoors during the summer….well….is something we all want to avoid. 

Read below for some tips on maximizing the probability of interval perfection while on the road and keeping that trainer on vacation.

Tip #1:  Terrain

 If you are doing a Zone 1 (Active Recovery) workout, picking a mountainous route is not ideal. The same rule applies for a harder workout, such as FTP coast downs (basically a 10 min Zone 4 workout in watching power is EXTREMELY important). For both, having a stretch of relatively flat road for solid 10-12 minute effort is necessary.

Tip #2:  Consistent Pedal Velocity

A smooth power stroke at the same pedal speed provides a much smoother power output, which is easier said (or typed) than done.  Use your recovery rides to practice your pedal stroke. 

Tip #3:  Garmin setup

 I recommend three things.

  • Set your Garmin to measure data in 3 second intervals
  • Use your lap button when executing specific intervals that are less than one hour (FTP/LT). Trying to use the lap button on a 2 hour endurance ride will end with frustration, since it is using average power.  
  • Setup your screen for the workout that you are attempting to do. No need for HR if you are targeting power. You may not need the time of day, temperature, etc. Setup the Garmin for exactly what you are doing, the fewer the items on the screen the better. ALWAYS keep cadence data, because in power workouts, cadence is always important.  


Tip #4:  Get into the spirit

Know the spirit of the workout. If you are going out on a Zone 2 Endurance ride, I suggest that you setup the Garmin with speed, distance, time, cadence, and normalized power. At the end of the ride make sure your normalized power is in your zone 2 range. If it is, then you probably met the spirit of the workout.  For the FTP coast downs I mentioned earlier, the workout consists of several 10 minute FTP efforts. Setup for AVERAGE power, you hit lap and over two minutes get your average power to your FTP (we will use 300 for easy math). Then you soft pedal allowing your average power to drop 10 watts (don’t pedal too softly because you want this drop to occur no faster than 20 seconds). Once your power is at 290, you are up out of the saddle with little less than a sprint raising the average power back to 300 watts. Once it says 300 watts, soft pedal to 290. Continue to do this until you have reached 10 minutes on the lap timer. Then rest. So over the 10 minutes you have averaged 300 watts, but you will see power in Zones 2,4,5, and 6 when you look at your trainingpeaks account (or whatever software you use).

One final thought. Execute the spirit of the workout and do not obsess over every pedal stroke or power number. Training workouts can have a steep learning curve. When you upload your files, be sure to provide a brief commentary – did you feel like executed the workout to standard?  Did your RPE tell you 300W but your power meter noted only 190?  All of this information, from the objective power data to the subjective commentary, enables your coach to best assess your progress.

Race Report: McDonald’s Tristate Criterium – Chuck Kyle

Race Report

McDonald’s Tristate Criterium – Huntington, WV

Category 3-4 Criterium
Category Masters 40+ Criterium

May 30, 2015
Late Afternoon races

FinishTo emphasize this race, I have to start with shutting off the alarm at 4:30 AM, getting up at 6:39 AM and Dana saying, “Let’s go!!” After a 407 mile drive, we ended up in my hometown of Huntington WV.

As I drove from DC to Huntington, the day was looking better and better. My daughters, Brynne and Shannyn, both texted to find out when I raced. By the time we arrived in Huntington, I was in a great mood and ready to take on two back-to-back races.

When the course opened to pre-ride, the anxiety of the other riders in the 3/4 race was evident, as most of the field lined up far before the official call-up. At the beginning of the race, Ben Kuhlman (Pro Mountain Outfitters ) toed the line beside me, and we talked about last weekend’s Tour of Tucker County. Ben mentioned he heard this crit was fast. Little did I know that this statement was foreshadowing of his race plan. When the official said go, Ben was off. So I, at least, got a good warm-up chasing him the first half lap.

The afternoon was sunny, hot, and windy. As the whistle blew to start the race, it was close to 100 degrees. The course is flat and non-technical, a rectangle with left-hand turns. On the back stretch there was a pretty good tail wind and then the final stretch a good head wind. Luckily, the town of Huntington had repaired any damage from a cold and snowy winter, and the roads were virtually pothole free.

From a picture of the start/finish line, you would think the McDonald’s TriState Criterium is part of the NRC. The crowd is great, the competition is real, the purse is outstanding, but the fields are small. If they could only get more teams to come into town, this would be a great venue, but a 7-hour drive for a crit is a bit much for MABRA and VACA based folks. A Saturday Crit and Sunday TT might be a way to make this a two-day event and make that long drive more palatable.

My goal for the CAT 3-4 race was to get a good warm-up for the Master’s race and not to be dead last. I figured that by setting the bar that low, I would not be disappointed. I sat in for the race, didn’t burn too many matches, and waited for the final sprint. The last lap, I was happy to be poster fodder, ended up in the bottom half of the field during the sprint finish.

The Master 40+ race was a little different. I wanted to improve upon my finish at the Tour of Somerville. I have been pleased with my last few races and wanted to give my daughters and my dad a good race result. I started off with the three basic rules for crit racing:
1.) Line up on the front line.
2.) Stay in the top quarter of the race.
3.) Execute a plan. The plan was with 2-3 to go, go off of the front.

One of the neat things about this race, teams show up and execute a plan. Texas Roadhouse was one such team. Over the first three or four laps, they attacked until one was successful. Three TRH riders and two from other teams would manage to stay away for the race. I was in the position to cover each of the breaks, but I did not think something would stick in the first half of the race. With that said, for the next 15 or so laps, TRH pack riders moved to the front and slowed the field. I was not in the position to either attempt a bridge or drag the field back, so it was evident that the field would be sprinting for fourth place (one of the break-away riders had floated back to the field). With seven to go, I was on one of the TRH wheels (Lance Fagerburg) and another TRH rider came up and told him he had the field sprint (they had already locked in 1-2-3 now they were just adding more money to the split). Now my strategy changed. Stay on Lance’s wheel and I did. The next two laps were all about high-speed survival and squeezing through holes I can’t believe I could make. Came down to the sprint finish and I rolled across the line 3rd in the field print, 7th overall.

Lesson Learned?? Race like I am on Lance’s wheel. Just not something that I have done in the past.

Post-Camp Recovery

Right before we left I was asked a question. I have ridden this week more than in the last few months or perhaps at all.  What do I do next??  The USMES Camp provided the opportunity to elevate your fitness level, but the camp is not what will make you fitter.  It is the recovery afterwards.
For many of us, getting in 300 miles and 18 hours of riding is not something we get to do every week.  So the first few days should be very light in terms of training stress incurred. Also try to limit any outside stress or additional training stress.  This means do not go to the gym to start that new weight lifting program since your intensity on the bike is lower.  Your body needs to absorb all of the hard work over the last week.  If you push too hard, you could put yourself in a season-limiting hole.

It is normal experience a sense of let-down through these recovery days. I know just getting on the plane did that to me.  Returning from sunny and warm days on the bike with free hotel cookies to normal life requires a training strategy….just like your camp preparation.  Relax and focus on good recovery tools.  The goal should be to put yourself in a position to resume normal training by the weekend.

Here are some tips for the next couple of days:

1.     Get the heart rate up, but just a little (75-80% of your LTHR): of us damaged our muscles during the last week and they need time to heal. Blood flow is the body’s healing method. Inflammatory metabolites and damaged proteins can be removed more quickly, while carbohydrates and amino acids can be delivered. Just sitting around for the next couple of days is even worse than if you went out and tried to train hard next week.  However, avoid any high heart-rate or high power efforts till at least Thursday or Friday. Thus, your training should be “restorative” and not more of a stress load. Ideally you will want to focus on whatever hastens recovery, rather than that which delays it.
2.     Focus on Recovery Eating:  This means taking in plenty of carbohydrates, proteins and healthy food as possible.  I like to say, eat like an ape.  I haven’t seen many McDonald’s in the jungles, lots of fruit, vegetables, nuts, all the things Jim and Lori told you about.  As Jim said, you should not try to lose weight during camp but the week after camp can affect the denominator in your W/kg.  If weight loss is an early season goal for you, use this next week to take advantage of your ramped up metabolism combined with the lighter training load.  Your body does not need as many calories as Mt. Lemmon and Kitts Peak demanded, so watch your dietary intake.
3.     Hydrate more often than usual. Lots and lots and lots of water.  I will even add a little Osmo to my water to provide flavor and sodium.
4.     Ugh sickness!  So one of the things to think about is that your immune system has been suppressed over the last week.  You are ripe to get sick if under the wrong circumstance (yep like all of those sick people on the airplane).  Think sanitation, be a germaphobe this week and get LOTS of sleep.
5.     Healing hands at camp, recovery hands at home. Go get a massage, this will hasten recovery and allow you to feel (and perform) better that much sooner.
6.     Reflect.  Take a few days and reflect on what you just accomplished.  Take this time and see how you are going to parlay it into a great season.  Book your flight for next year.

Every camp I do I learn more about our sport, athletes and myself as a coach. You have learned a lot and accomplished a lot.  Take the time and go back to your TrainingPeaks account or your Training Log.  Write what you have learned so you can reflect on it late in the season and at the beginning of your next camp.  The big thing for you right now is to focus on post camp recovery or you won’t reap the benefits of your fitness bump.

We had a lot of great coaches out in Tucson this week.  If you have any questions, please don’t hesitate to email me [email protected], ask the question on the internal Facebook page, or reach out to Jim, he has an email address for all of the USMES Affiliate Coaches.

Rubber Side down,

Chuck

Strength and Conditioning for Cyclists

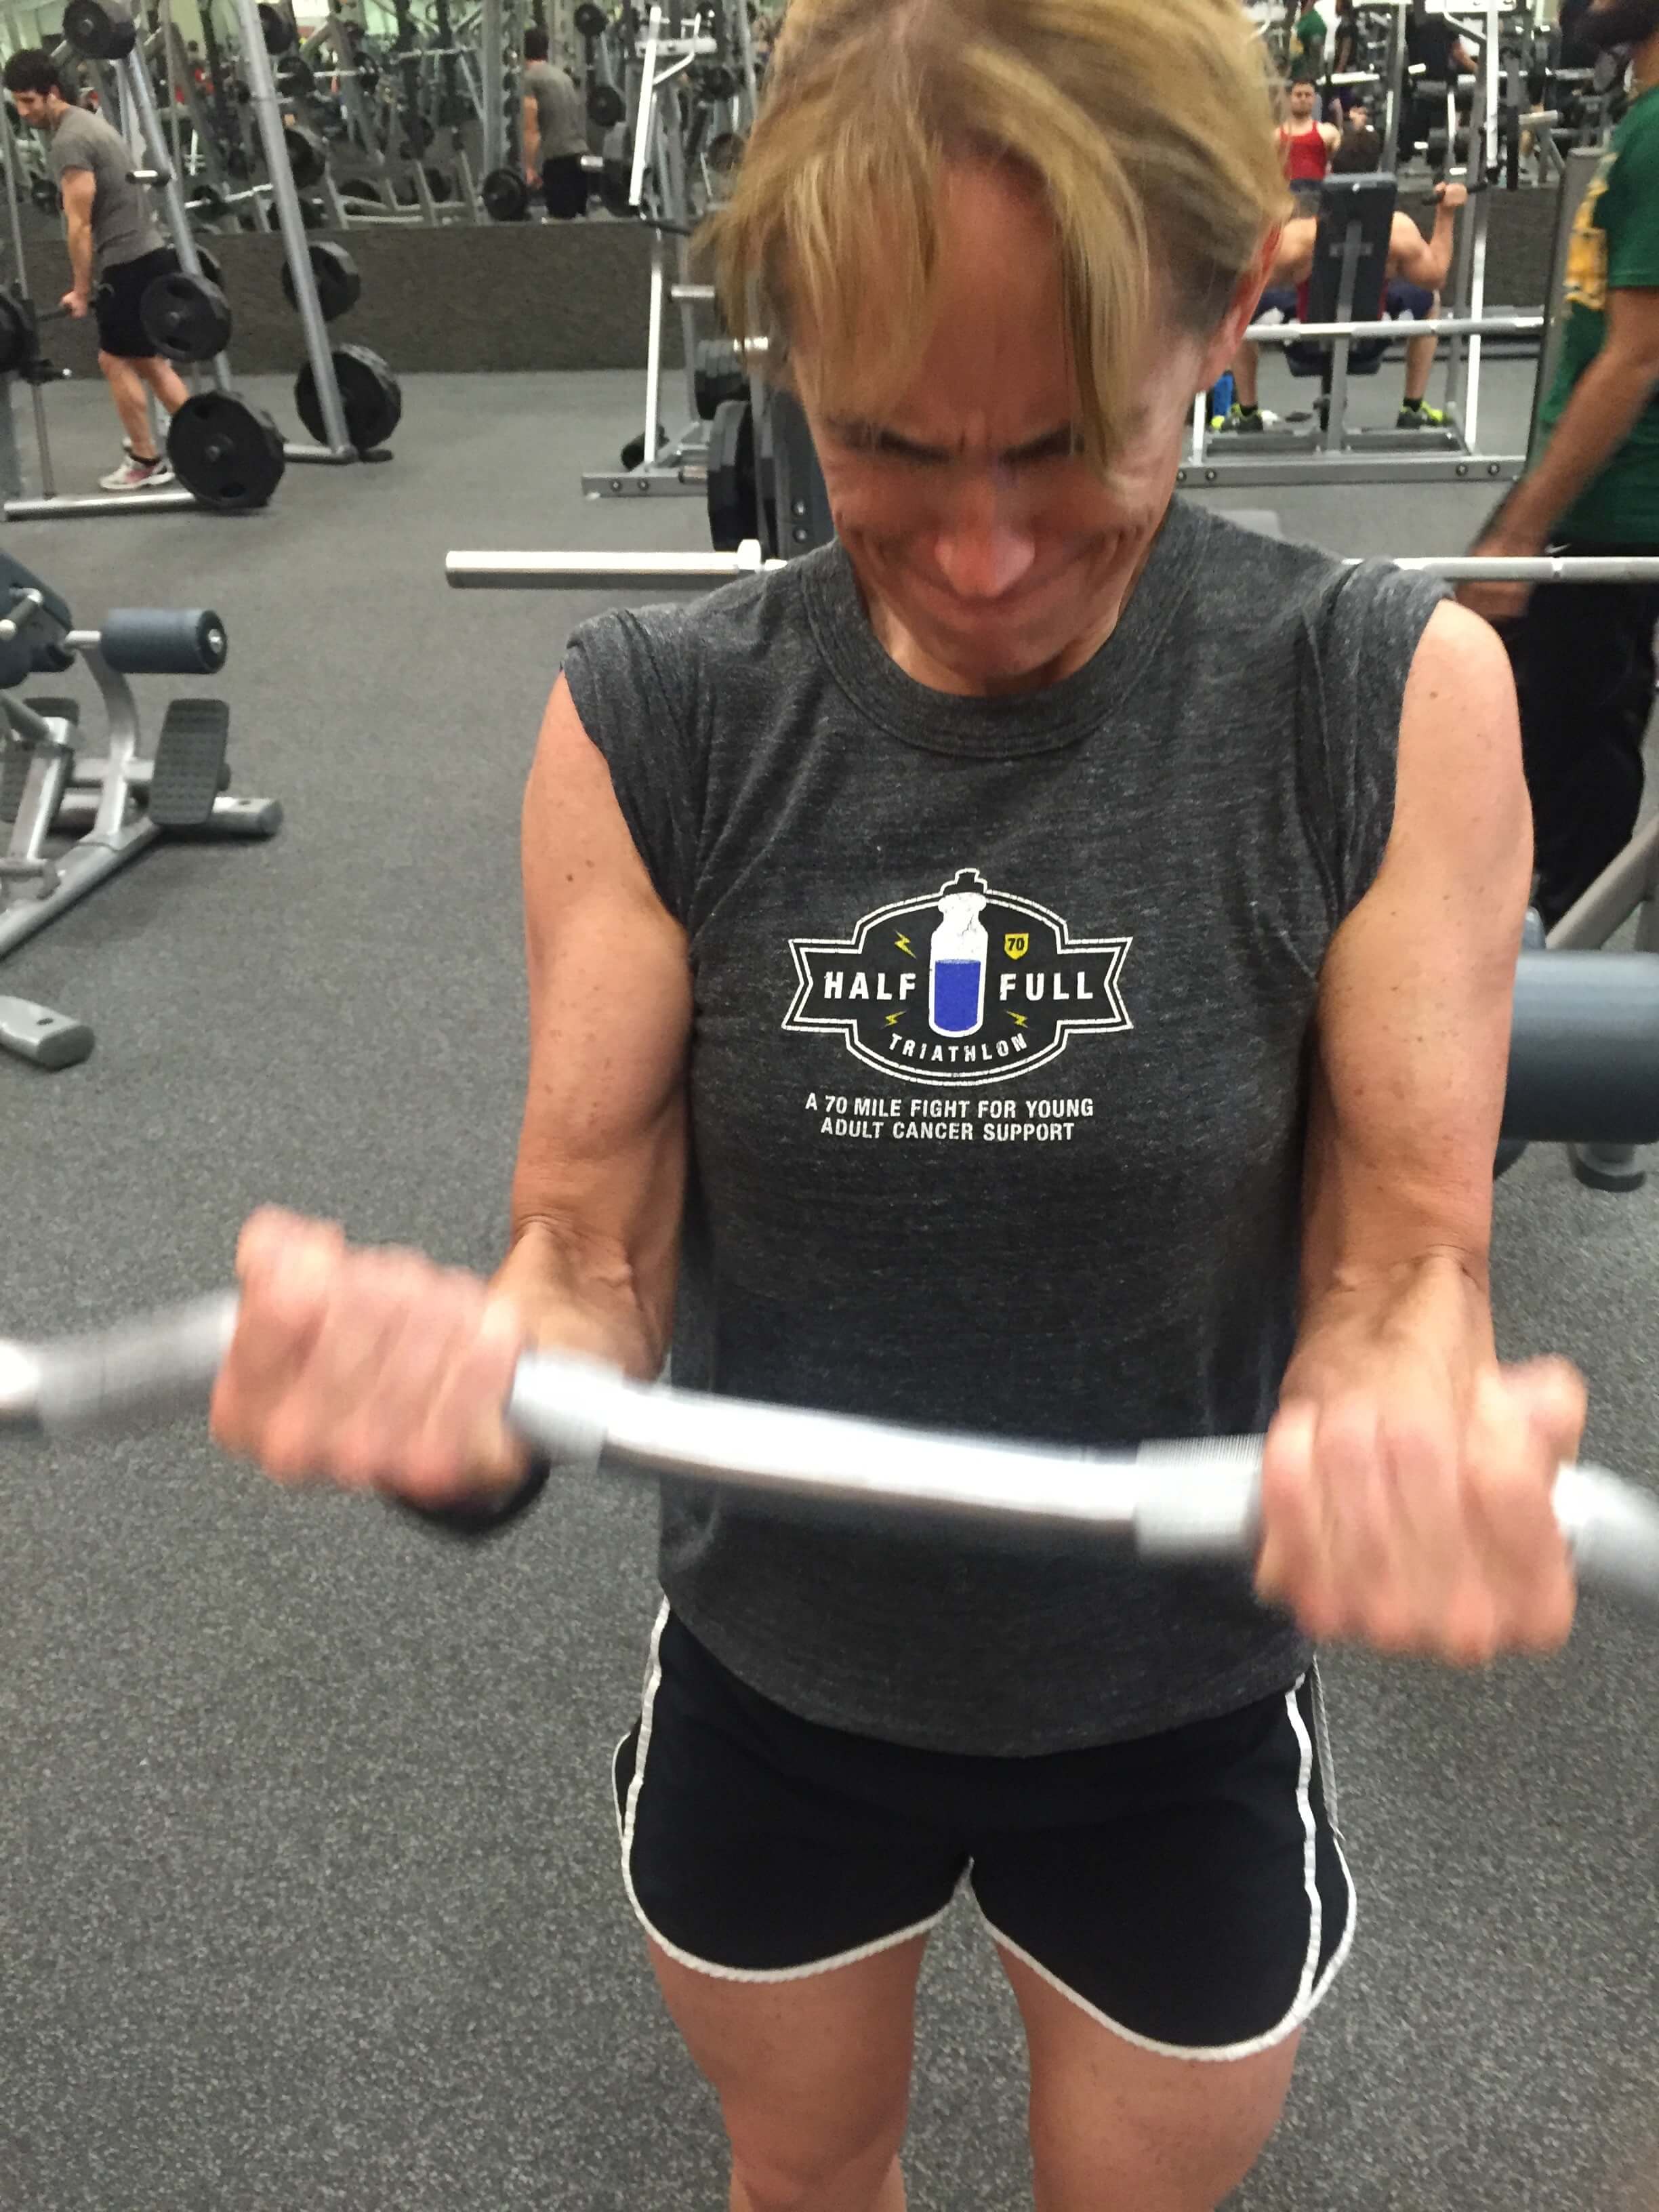
EZ Bar Curls
Charles M. Kyle and Dana M. Stryk

During the heat generated by both warm summer days and battles in the peloton, non-cycling activities take a back seat to the race calendar.  As the days get shorter and colder and time on the road turns into time on the trainer, our thoughts can turn to ways in which we can improve our on-the-bike performance using off-the-bike training.  At KyleCoaching, we target two goals during the off-season:  strength and flexibility improvements, and we address the former below.
Mention the phrase “weight-lifting” to 10 people and you will receive different definitions.  From Arnold Schwarzenegger’s idea of “Pain is weakness leaving the body” to the Saturday Night Live parody’s of the Governator, a universally accepted theory of what to do in the gym does not exist.  Below you will find our strength and conditioning philosophy, a little bit of the science of cycling and weight lifting and some general recommendations on ways in which you can use your time efficiently in the gym to increase podium probability come spring and summer.

Our Philosophy:

Very simple:  Become stronger.  Become faster.  Race better.
Our method of strength and conditioning training will be broken down into four phases each having a physiological purpose. First acclimate your legs to the weight room, then 2) build some muscle 3) train that muscle to produce great force, and finally 4) enable that muscle to produce great force at cycling specific speeds.  What makes our resistance training program cycling specific is the neuromuscular sprint work that is coupled to the lifting in phases 3 and 4.

The Science:

Weightlifting is the means to deliver more of both power and force to a cyclist’s legs, with force being the ability to simply move weight and power being the product of that force and the velocity at which the athlete can generate.  For example, for a cyclist, force is the ability to push down on the pedal.  Power is this ability multiplied by the velocity (speed) of the pedal stroke.  From watching the Tour de France when it heads to the mountains and the sprinters move from stage victories to the groupetto, we know that sprinters and climbers require a different tool kit.  Off-season strength and conditioning helps to augment existing strengths and overcome areas of weakness.

Phase 1: Anatomical Adaptation (3 Weeks)

The first phase is called anatomical adaptation, and your objective is to develop and adapt your body to the levels of intensity that will follow in later phases.   Strengthening your core, strengthening your connective tissues (ligaments and tendons), and correcting your muscular imbalances are your main objectives.

Phase 2: Hypertrophy (2 Weeks)

The second phase, hypertrophy, is the muscular development phase, with the objective to build muscle mass, specifically in the prime movers, which are the muscles that do most of the work when you ride.

Phase 3: Maximum Strength (2 Weeks)

In order for muscles to be powerful, they have to be strong, strength being a key variable in power. So the maximum strength phase focuses on developing maximum strength in the prime movers of your sport.  The muscles and movements used for sprinting, backpedaling, jumping, changing directions rapidly, and any other cornerback-related movements are strengthened.  It’s time to train your muscles   to produce more forceful contractions, teaching your brain how to “enervate” (aka contract) the muscle you’ve built in the previous hypertrophy phase.  Thus, fewer sets, fewer reps and greater weight are the name of the game.

Phase 4: Power (6 Weeks)

In the power phase, strength gained in the maximum strength phase is converted into power, through Olympic-lifting, plyometric, and other ballistic exercises.   The goal is to increase the firing rate of your muscles, or how fast they go, so weight is reduced.
 

KyleCoaching Strength and Conditioning Recommendations:


Rules of the Road:

·         Prior to beginning any exercise program, please contact your physician to make sure that strength training and your health/body are compatible.
·         Learn the proper lifting form and function prior to implementing any strength training program.  Mimicking others in the weight room is not advisable.  There are lots of examples of poor lifting technique.
·         Listen to your body.  Soreness = good.  Pain = bad.
·         If you have not executed a training program in the last month, err on the side of caution so that you can walk the next day.
·         These recommendations target only the lower portion of your body.  If time allows, target your upper body as well.  Core strength makes us fitter overall and better in a TT or sustained climb.

General Exercises:

Two categories of strength and conditioning exercises exist:  compound and specific.  The former refers to exercises which target more than one muscle group while the latter targets one.  As much as possible, we recommend using compound exercises.
Squats – (compound) –  you have many choices, from free-weight squats with barbells or dumbbells to the Smith machine.  Technique is very important.  Unless contra-indicated for your body, use a stance that is the width of your pedaling stance and a complete range of motion.
Leg Press – (compound) – most common versions are the hack squat and the seated leg press.  Again, stance width = pedaling stance.
Leg Extension – (specific) – classic machine.  Learn how to adjust the parts of the machine so that you have a full range of motion without knee pain.
Leg Curl – (specific) – Seated and lying curl machines.  Back extensions during Phases 1 and 2 are another option.
Given your workout facilities and crowding, especially after the beginning of the New Year, you may need to be creative with respect to the compound leg exercises.  Traveling or stationary lunges with dumbbells are a good substitute if you cannot get to a leg press or squat machine.

Phase 1: Anatomical Adaptation (3 Weeks)

Goal:  Ease your body into lifting and determine easy versus  heavy weight targets.
Frequency:  2 visits per week, 48 hours rest between visits.  Pay attention to your cycling training requirements – long ride and weight training on the same day are less than optimal.
Workout:
·         Warmup:  10 minutes on the treadmill, easy walking.
·         Exercise #1:  Squat or Leg Press.
o   Set #1:  Warm-up set – 8-10 reps  (note:  depending on how much weight you lift, you may need more than one warm-up set at ascending weights)
o   Sets #2-4:  Main Sets
§  Weight Target:  Light to Medium
§  2-3 Sets
§  10-12 Reps
§  Note:  Goldilocks and porridge time:   It will take some time to figure out the optimal weight.  If you complete the first set and it was too easy, move up in weight.  Too hard, lower the weight.
·         Exercise #2:  Leg Extension
o   Set #1:  Warm-up Set to make sure knees are good and the position on the machine is safe. 8-10 reps.
o   Sets #2-3:  Main Sets
§  Weight Target:  Light to Medium
§  2 Sets
§  10-12 Reps
§  Note:  Goldilocks and porridge time:   It will take some time to figure out the optimal weight.  If you complete the first set and it was too easy, move up in weight.  Too hard, lower the weight.
·         Exercise #3:  Leg Curl
o   Set #1:  Warm-up Set to make sure knees are good and the position on the machine is safe. 8-10 reps.
o   Sets #2-3:  Main Sets
§  Weight Target:  Light to Medium
§  2 Sets
§  10-12 Reps
§  Note:  Goldilocks and porridge time:   It will take some time to figure out the optimal weight.  If you complete the first set and it was too easy, move up in weight.  Too hard, lower the weight.
Workout Notes:
·         If possible, alternate leg press and squats as the first exercise so that you do squats 1 day per week and leg press one day per week.  Given gym crowding and equipment constraints, this may not be possible.
·         Rest between sets:  2 minutes or so and WALK around rather than sit.  Sitting = bad!!!
·         Rest between exercises:  3-5 minutes.

Phase 2: Hypertrophy (2 Weeks)

Goal:  Using the same exercises, time to step up to some heavier weights.
Frequency:  2 visits per week, 48 hours rest between visits.  Pay attention to your cycling training requirements – long ride and weight training on the same day are less than optimal.
Workout:
·         Warmup:  10 minutes on the treadmill, easy walking.
·         Exercise #1:  Squat or Leg Press.
o   Set #1:  Warm-up set – 8-10 reps  (note:  depending on how much weight you lift, you may need more than one warm-up set at ascending weights)
o   Sets #2-4:  Main Sets
§  Weight Target:  Medium at the start, increasing weight by 5% for each set.
§  2-3 Sets
§  10-12 Reps
§  Note:  Goldilocks and porridge time:   It will take some time to figure out the optimal weight.  Write down the weights used for future reference.
·         Exercise #2:  Leg Extension
o   Set #1:  Warm-up Set to make sure knees are good and the position on the machine is safe. 8-10 reps.
o   Sets #2-3:  Main Sets
§  Weight Target:  Medium at the start, increasing weight by 5% for each set.
§  2 Sets
§  10-12 Reps
§  Note:  Goldilocks and porridge time:   It will take some time to figure out the optimal weight.  Write down the weights used for future reference.
·         Exercise #3:  Leg Curl
o   Set #1:  Warm-up Set to make sure knees are good and the position on the machine is safe. 8-10 reps.
o   Sets #2-3:  Main Sets
§  Weight Target:  Medium at the start, increasing weight by 5% for each set
§  2 Sets
§  10-12 Reps
§  Note:  Goldilocks and porridge time:   It will take some time to figure out the optimal weight.  Write down the weights used for future reference.
§ 
Workout Notes:
·         If possible, alternate leg press and squats as the first exercise so that you do squats 1 day per week and leg press one day per week.  Given gym crowding and equipment constraints, this may not be possible.
·         Rest between sets:  2 minutes or so and WALK around rather than sit.  Sitting = bad!!!
·         Rest between exercises:  3-5 minutes.
·         Weight thoughts:  There will be a little devil on your shoulder that tells you that the weight is heavy enough.  Do you want to win next season?

Phase 3: Maximum Strength  (2 Weeks)

Goal:  It’s time to train this muscle to produce more forceful contractions.
Caution:  If you haven’t used one thus far, you need to do so – find someone to spot you during Exercise #1 and to help launch the movement for the leg curls and leg extensions.  Make sure the spotter knows what he or she is doing and is strong enough to save you should you hit failure (i.e. a spotter standing four feet away from you during your squats will not be able to “save” you if you fail).
Frequency:  2 visits per week, 48 hours rest between visits.  Pay attention to your cycling training requirements – long ride and weight training on the same day are less than optimal.
Workout:
·         Warmup:  10 minutes on the treadmill, easy walking.
·         Exercise #1:  Squat or Leg Press.
o   Set #1:  Warm-up set – 8-10 reps.  Now that the weights are very heavy, you will need to spend more time warming up!!!
o   Sets #2-4:  Main Sets
§  Weight Target:  Heavy at the start moving to “Oh, my goodness. I am squatting with the Garmin Team Bus on my shoulders!!!).
§  2-3 Sets
§  4-6 Reps
§  Note:  Goldilocks and porridge time:   If the first set you can hit 6, increase the weight.  Anything less than 6, keep the weight unchanged.
·         Exercise #2:  Leg Extension
o   Set #1:  Warm-up set – 8-10 reps.  Now that the weights are very heavy, you will need to spend more time warming up!!!
o   Sets #2-3:  Main Sets
§  Weight Target:  Heavy at the start moving to “Oh, my goodness. I am squatting with the Garmin Team Bus on my shoulders!!!).
§  2 Sets
§  4-6 Reps
§  Note:  Goldilocks and porridge time:   If the first set you can hit 6, increase the weight.  Anything less than 6, keep the weight unchanged.
·         Exercise #3:  Leg Curl
o   Set #1:  Warm-up set – 8-10 reps.  Now that the weights are very heavy, you will need to spend more time warming up!!!
o   Sets #2-3:  Main Sets
§  Weight Target:  Heavy at the start moving to “Oh, my goodness. I am squatting with the Garmin Team Bus on my shoulders!!!).
§  2 Sets
§  4-6 Reps
§  Note:  Goldilocks and porridge time:   If the first set you can hit 6, increase the weight.  Anything less than 6, keep the weight unchanged.
Workout Notes:
·         If possible, alternate leg press and squats as the first exercise so that you do squats 1 day per week and leg press one day per week.  Given gym crowding and equipment constraints, this may not be possible.
·         Rest between sets:  2 minutes or so and WALK around rather than sit.  Sitting = bad!!!
·         Rest between exercises:  5 minutes.
·         Weight thoughts:  There will be a little devil on your shoulder that tells you that the weight is heavy enough.  Do you want to win next season?

Phase 4: Power (6 Weeks)

Goal:  Time to fire the guns, so to speak and work on how quickly your muscles can contract and produce the pop needed to create a break or win a sprint.
Workout:
·         Warmup:  10 minutes on the treadmill, easy walking.
·         Exercise #1:
o   This section uses plyometric movement with little weight.
o   Select one exercise from the list below, targeting 3 sets of 15-20 reps.
§  Jump squats with a Smith machine or dumbbells
§  Plyo step ups with dumbbells
§  Cleans
·         Exercise #2:  Leg Extension
o   Set #1:  Warm-up set – 8-10 reps.
o   Sets #2-3:  Main Sets
§  Weight Target:  Light to Medium
§  2 Sets
§  15-20 Reps
·         Exercise #3:  Leg Curl
o   Set #1:  Warm-up set – 8-10 reps.
o   Sets #2-3:  Main Sets
§  Weight Target:  Light to Medium
§  2 Sets
§  15-20 Reps
·         Exercise #2 and #3 advanced options:
o   Set #1:  Warm-up set – 8-10 reps.
o   Set #2::  Main Sets
§  Weight Target:  Very light to light
§  1 Set
§  4 minutes


How is my efficiency as a competitive cyclist??

On my flight back to Washington from the US Military CyclingTeam ‘s training camp in Tampa, my teammate, Jim, and I chatted about the things coaches find interesting:  how much better life would be if our athletes would only execute the training program as written, different ways to encourage better FTP test and so on.  During our conversation about efficiency, I had an “a-ha” moment that I wanted to share.

When I use the word efficiency, you probably think of one of two things:  pedal stroke or time management.  While we use efficiency to reference biomechanical aspects of cycling, our conversation focused on the latter.  If I were to say to you, “We need to discuss time management,” you would think our chat would focus on balancing work life with workout time and family time.  If Jim wore only a coach’s hat that would probably be the case.  However, Jim is also a Ph.D. nutritionist, and his definition of efficiency extends this discussion to include post-workout, nutrition and sleep efficiencies.  To be an athlete is a life style choice that extends beyond the ability to generate high watts and push the body through pain.

What does this term, “life style” mean?  On Amazon, there are books that talk about the time-crunched cyclist, but they are focusing in on simply the workouts.  My discussion with Jim becomes important in this context.  Competitive cyclists hire coaches like us to design their training plans, which gives the athlete a better quality training strategy (outsourcing gains) and increases free time (opportunity cost).  The important question:   what do they do with this extra time?  This is where being a competitive cyclist, whether pro or Master’s racer, becomes a life style and simply not something to do on the weekends. 

Ask yourself the following questions:    What have I done to ensure I have the time to accomplish my workouts?  How do I arrange life to ensure that I am most efficient to being able to have the time to execute?  Nutrition??  Have I properly planned my meals?  My snacks?  I have an hour from end of ride to arrival home – how will I fuel recovery?  Will I have a full 8 hours of sleep to recover tonight?  What does your Sleep Efficiency Plan look like?  If you have to get up at 4 AM for a Master’s swim or to do CompuTrainer intervals, do you plan correctly to go to bed early enough to maximize execution?

All of these are just food for thought.  My discussion with Jim made me think.  Am I really committed to being the best amateur cyclist I can be, or am I simply going through the motions, being Nutritional Inefficient, Workout inefficient, Sleep Ineff…. You get the point.

Why Training with Heart Rate Will Break Your Heart (at the Finish Line)

To use a shopping analogy, training with heart rate training (HRT) and power-based training (PBT) is similar to shopping with friends.  The friend that tells you to buy the new Garmin 810 because you simply must have the newest means of measuring ride statistics is HRT.  The friend who points out you already have an 800 and can live without the Bluetooth ability to sync with your smartphone, is PBT.  The difference?  

HRT tells you what you want to hear.  PBT tells you the truth.
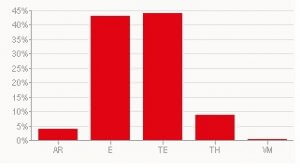
Suppose your training plan calls for an endurance/tempo ride with threshold bursts and minimal time spent in Zone 1.  You strap on your HR strap, go out for your ride, finish and upload to Strava and TrainingPeaks for KOMs and PCEMs (praise from your coach emails), respectively.  Your heart rate data shows the following data:

You think to yourself, “Wow.  Move over Joe D.  There is a new local KOM!  I killed it.  I was hardly in active recovery.  Can’t wait to get that email from my coach telling me  I am simply the greatest athlete he has ever coached!!”

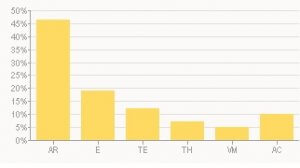
Meanwhile, had you had power, that same ride would have generated the following power data:

Compare the difference in the percentage of time spent in Zones 1 and 3:  With HR data, it appears you spent the largest chunk of time at tempo.  With power data, that conclusion is fallacious.  Relying solely on HR data increases the chance you overestimate the quality and intensity of your workouts, which may leave you off the podium on race day with a broken heart.
HR and power combined can be a powerful tool to measure how well your body responds to hard efforts, by looking at the decoupling of your HR.  This training statistic is the subject of a future post.
**  These two charts are from an actual ride with the US Military Cycling Team in Tampa Fl **

The New Math: Why 1 Hour on the Trainer is not equal to 1 Hour on the Road

Winter months make us dust off the trainer that helped us warm-up at races.  Even when the weather outside is not so frightful, the shorter days and demands on our time make riding outside during the week more difficult.  So we subscribe to NetFlix, find a tv series with several years and episodes available, and begin indoor training rides.

We can all make a list of the reasons why one dreads indoor training:  boredom, the sound drives the dog crazy, no Strava KOMs, no impromptu town line sprints or Starbucks caffeine stops.  We all have our favorite way to make the time pass, whether it is an iTunes playlist, taking a tour in Sufferlandia, or on a CompuTrainer with an ErgVideo.  One thing we may forget to do….think about the translation of road hour to trainer hour.

When you look at a power file of an outdoor endurance training ride (absent intervals), we see a great deal of time spent in Zone 1 and low Zone 2.  From the need to stop to drafting behind someone, our energy expenditure on the road is more volatile than on a trainer.  While on the road to nowhere, our trainer time will, on average, show less time at both the lower and upper ends of the training zone spectrum, which affects the type of workout one can efficiently complete on the trainer. 

The math bottom line:  If you are headed outdoors for a 3 hour endurance ride and want to convert it to something indoors, shorten the duration and add some tempo intervals to bump up the intensity.  Our math exchange rate:  1 hour on the trainer = 1.5 hours on the road for endurance efforts.

What does ‘highest power output’ mean?

A question has been brought up to me several times when talking about ‘highest power output’ in regards to an interval.

The Question:

I am a little confused what power range I was looking for – what does ‘highest power output’ mean? After consulting my Chris Carmichael’s Ultimate Ride, which described the power interval as ‘maximal‘ which didn’t give me the specific information I was looking for either. I wanted to know what power range I was supposed to hit. So next I went to Hunter Allen/Andrew Coggan’s Power Meter book, I didn’t find the power interval, but I did find a chart that showed that Power Level 6 intervals could range from 30 seconds to 3 minutes. So I assumed that I needed to shoot for Power Level 6 for my 2 minute intervals. So fast forward, interval 1, set 1, I couldn’t hold level 6 for very long and stopped after I couldn’t hold level 6. I stayed at level 6 as long as I could, then as my power dropped, I just kept the pressure on as hard as I could without regard for the power level number. So what does “highest power output” mean?

The Answer:

So when we talk about ‘highest power output’ this takes a little art (perceived exertion) on your side until we have the science (data) to really fine-tune power numbers. In other words, your workout effort answers the following question: “What is the hardest effort I can do for the allotted interval time? So if I said, Zone 6, we don’t know if you could hold Zone 6 for 2 minutes, but this also gives you a feeling of what you can handle. If you are in a race in which you are trying to bridge to a break away, you may or may not know if you were ‘on the rivet’. These types of exercises help you determine (RPE – Rated Perceived Exertion) of what you can handle. Also, by time you are on the 2nd set of intervals and are on the last 2minute effort, you may only be able to hold Zone 4. This is not a failure but possibly a success, especially if you can then maintain your ‘base’ zone and not go to AR to recover.

So to control the ramp up. Start in an easier gear; get your cadence to 90. Once the cadence climbs to 95-100, then shift to the next higher gear, start building the cadence to 95-100, repeat until you are in zone.

Learning to do these is a skill all into itself. Remember the spirit of the ride, this is to simulate ‘surges’. So you are going along at endurance pace. Then there is a need to surge, could be a break could be a great opportunity. Takes about 15-30 seconds to get up to speed and power, cadence is climbing, hold the maximal power (the most you think you could do for 2 minutes) then recover (at endurance) for three minutes. Repeat this surge for the assigned number of intervals. Then rest for 8 minutes. Time to go again, do another set.

How do I increase my VO2 Max?

Whether your training plan uses periodization or focuses on targeting specific energy systems, most of us have found ourselves grinding through those tough 3- to 5-minute efforts to increase VO2 max—or as it’s often called, the “big aerobic engine.” But what exactly is VO2 max, and how can you improve it?


What is VO2 Max?

VO2 max, or maximal oxygen consumption, represents the maximum capacity of your body to transport and utilize oxygen during exercise. It’s often considered a gold standard in endurance sports because it measures your body’s ability to generate energy (ATP) through aerobic metabolism. While the science behind it is fascinating, most of us are more focused on how to make ours better.

For a deeper dive into the physiological mechanics of VO2 max, check out this comprehensive resource from the National Library of Medicine.


How to Train for VO2 Max

In cycling, VO2 max is typically associated with efforts that fall between 106% and 120% of your Functional Threshold Power (FTP), as outlined in Training and Racing with a Power Meter by Hunter Allen and Andrew Coggan. These efforts are generally sustainable for 3 to 8 minutes, though shorter durations (around 3 minutes) are often more practical during races. This is why VO2 max interval workouts are designed around repeatable efforts within this range.


The Interval Method: Intervals to Exhaustion

One of the most effective ways to increase VO2 max is through Intervals to Exhaustion. The concept is simple: execute repeatable intervals at 106-120% of FTP, ensuring that each effort remains within this power range. Here’s a step-by-step breakdown:

  1. Warm-Up: Begin with a proper warm-up to prepare your muscles and cardiovascular system.
  2. Set the Interval Plan:
    • Efforts: 6 intervals of 3 minutes “on” and 3 minutes “off” for recovery.
    • Intensity: Aim for 106-120% of your FTP. For instance, if your FTP is 200 watts, your target range is 212-240 watts.
  3. Pacing: Maintain steady power during each 3-minute effort. A dramatic power drop signals poor pacing or fatigue.
  4. Assess Fatigue: Stop the set when your power consistently falls below 106% of FTP. Continuing at lower intensities won’t effectively target VO2 max.

Example Workout Progression

After completing the first set of 6 intervals, take a 10-minute recovery. If you feel ready, repeat a second set. Successfully completing both sets at the target power range is an excellent sign of progression. Afterward, cool down and reassess your FTP if needed.


Why Pacing Matters

Athletes often overestimate their capacity, going too hard on the first interval and fading quickly. For example, starting at 125% of FTP and fading to 95% by the second minute turns the workout into an anaerobic capacity effort, not a VO2 max session. Aim for consistency across all intervals.

For a more detailed guide on interval pacing, consider reviewing the “Guidelines for Optimal Intervals” section in Allen and Coggan’s book, or explore this excellent training guide from TrainingPeaks.


Alternative VO2 Max Workouts

If you’re looking for variety, try efforts like:

  • 5×5 Intervals: Five intervals of 5 minutes at 110% of FTP with 5-minute recoveries.
  • Tabata Workouts: Short bursts of 20 seconds “on” at 150% of FTP followed by 10 seconds “off,” repeated for 8 minutes.

For additional VO2 max workouts tailored to your needs, contact me or check out this cycling training library.


Final Thoughts

Improving VO2 max takes consistency, proper pacing, and strategic recovery. Monitor your performance metrics closely and adjust your training as needed. Over time, these efforts will translate to a stronger aerobic engine and improved performance across all aspects of cycling.

Looking for personalized guidance? Schedule a call or reach out for a customized training plan! 🚴‍♂️


Additional Resources:

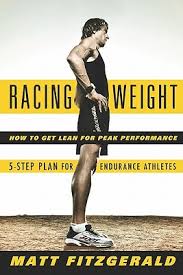
Book Review: Racing Weight: How to Get Lean for Peak Performance ~ Matt Fitzgerald

Book Review: Racing Weight: How to Get Lean for Peak Performance ~ Matt Fitzgerald

Racing Weight: How to Get Lean For Peak Performance

Racing Weight: How to Get Lean For Peak Performance
By Matt Fitzgerald
Velopress, 2009, 288 pages, $18.95


Like many other books on cycling fitness, I picked up Racing Weight purely do to advertising within Velonews. I really had minimal expectation and figured that this book would layout the obvious points that many others do at each publication. The first thing that caught my attention was the second chapter entitled, “How to Determine Your Optimal Performance Weight”. Noticing that it was just a mere 21 pages from the beginning, I resisted the urge and started on page one. Unlike many other writers, Matt Fitzgerald kept my interest peaked as he explained the five steps outlined in Racing Weight. My eagerness to jump to page twenty-one was set to rest as I began highlighting information just in the introduction.


Chapter Two continued information that I have been looking for since my first cycling event over a decade ago. My calculation of what I felt would be a good “weight” was close, but the concept of % Body Fat had only been a reading that I saw on the three hundred dollar Tanika scale that sits on my bathroom floor, not something that I would train towards. Though I had to read chapter two twice, to gain a firm grasp of the concepts, I walked away with the ability to log onto TrainingPeaks and enter a season goal, based on knowledge and research, not a blind assumption on my part. I now know my % Body Fat Goals. Notice I did not talk weight goals, why not, read Chapter Two and you too will be thinking is this manner.


Matt continues his book by articulating the five steps to achieve this Optimized Weight. The steps are simply improving your diet, balancing your energy sources, timing your nutrition, managing your appetite and training right. Though this information is sporadically found in other books, Racing Weight lays them out concisely and provides a simple means of calculation, unlike other books trying to account for the number of calories in that last Mocha. Matt’s methodology looks at food in a more holistic view, based on quality not on strictly counting. Yes, that Snicker’s has carbs but should it really be counted as part of the typical 60-20-20 carb, fat, and protein ratio?


Matt finishes off the book with a chapter showing what a professional athlete consumes, a chapter giving the recipe of some “Endurance Fuel”, and finally the obligatory appendix on some strength exercises. I am looking forward to trying some of the recipes. Matt also includes a very informative chapter on the roles of supplements, which many cyclists will find interesting.


All in all, Racing Weight is well written and a fast read. Mine is now littered with highlights, notes, and sticky flags and will become part of my daily reference library. This is necessary read for all amateur cyclists who desire to take their training and racing to the next step.